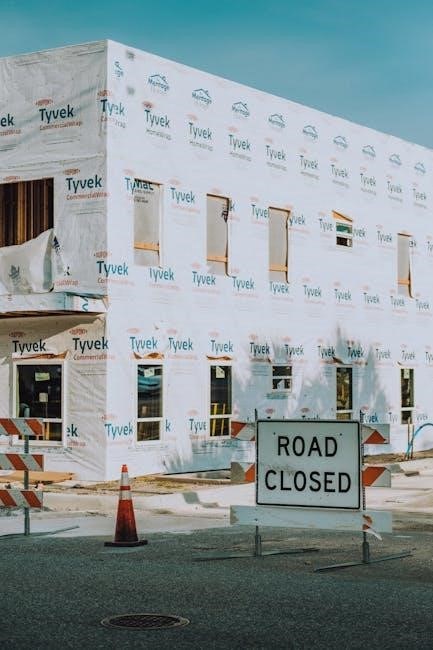
General Installation Guidelines for Tyvek
Ensure proper shingling by starting at the bottom of the structure to allow water shedding. Install after roof sheathing and before windows/doors for optimal performance.
Surfaces must be clean, dry, and free of debris for proper adhesion. Always follow manufacturer guidelines and ensure material compatibility to maintain the integrity of the WRB;
Be aware of UV exposure limits, typically 4 months for residential and 9 months for commercial use, to prevent degradation of the Tyvek material.
1.1. Timing of Installation
The optimal time to install Tyvek is after roof sheathing and wall construction but before windows, doors, and exterior siding. This ensures proper integration and water-tight seals.
Residential installations typically require covering Tyvek within 4 months (120 days), while commercial projects allow up to 9 months (270 days) before exterior finishes are applied.
Install Tyvek when weather conditions are calm, avoiding direct sunlight for prolonged periods to prevent UV degradation. Always follow manufacturer guidelines for timing to maintain warranty and performance.
1.2. Surface Preparation
Ensure surfaces are clean, dry, and free of dirt, oil, or debris for optimal Tyvek adhesion. Verify sheathing is secure and even, with no protruding nails or irregularities.
For non-nail-base surfaces like foam, additional preparation may be required to ensure proper fastening. Always inspect the area for damage or imperfections before installation.
A clean, properly prepared surface guarantees a strong, durable bond between Tyvek and the substrate, enhancing the water-resistive barrier’s performance and longevity.
Specific Installation Instructions
Start at the bottom for proper shingling, ensuring water sheds effectively. Integrate with flashing systems and ensure compatibility for residential, modular, or commercial applications. Follow manufacturer guidelines strictly.
2.1. Residential Installation
For residential installation, start at the bottom of the structure to ensure proper shingling. Install Tyvek horizontally or vertically with the printed logo facing outward. Overlap edges by 6-12 inches and secure with approved staples. Ensure the membrane is tight and wrinkle-free. Windows and doors should be flashed according to DuPont guidelines before installing Tyvek. The material must be covered within 120 days of installation to prevent UV degradation. Always follow manufacturer instructions for optimal performance and durability.
2.2. Modular Construction Installation
In modular construction, install Tyvek after wall panels are assembled but before exterior cladding. Ensure the membrane wraps completely around sheathing boards, starting 300 mm from corners. Secure with staples at 150-300 mm intervals. Overlaps must be sealed with Tyvek Tape for airtightness. Flashing at windows and doors is critical; use DuPont Self-Adhered Flashing Products. The membrane should be covered within 270 days to prevent UV damage. Follow manufacturer guidelines to maintain the integrity of the water-resistive barrier in modular setups.
2.3. Commercial Installation
For commercial projects, ensure Tyvek is installed after structural elements are secured. Begin at the bottom to ensure proper shingling, overlapping seams by at least 150 mm. Use Tyvek Tape to seal laps and ensure airtightness. Flashing must integrate seamlessly with windows and doors, following DuPont Flashing Systems Guidelines. The membrane must be covered within 270 days to prevent UV degradation. Always follow manufacturer instructions for compatibility with exterior materials and systems to maintain the water-resistive barrier’s effectiveness in large-scale applications.

Window and Door Flashing
Ensure proper integration of Tyvek with window and door flashings, maintaining continuity and shingling. Use Tyvek Tape to seal laps for a watertight seal, following DuPont Flashing Systems Guidelines.
3.1. Flashing Preparation
Proper flashing preparation is critical to ensure a watertight seal. Clean and dry all surfaces before installing flashings to promote adhesion. Prime surfaces if required for optimal performance. Position flashings around windows and doors, aligning them with the Tyvek membrane for seamless integration. Ensure all edges are securely fastened and sealed with Tyvek Tape to prevent water infiltration. This step is essential for maintaining the integrity of the weather-resistant barrier system.
3.2. Integration with Tyvek WRB
Ensure proper integration of flashings with the Tyvek WRB by aligning them seamlessly. Start at the bottom of the structure to maintain proper shingling. Securely fasten flashings to prevent water infiltration and ensure the membrane remains intact. Use Tyvek Tape to seal all laps and edges for a watertight seal. This step ensures the weather-resistant barrier functions effectively, protecting the building envelope from moisture damage.
Fastening Methods
Use 1-inch crown staples for securing Tyvek membranes. For non-nail-based surfaces, alternative fastening methods like tape or temporary solutions may be necessary for proper installation.
4.1. Staple Requirements
When installing Tyvek, use staples with a minimum 1-inch crown. This ensures a secure hold on various surfaces, including wood and foam. However, for non-nail-based materials, additional fastening solutions may be required to maintain the integrity of the weather-resistant barrier. Always refer to the manufacturer’s guidelines for specific staple requirements to ensure optimal performance and durability of the Tyvek membrane. Proper fastening is crucial to prevent tears and ensure a tight seal.
4.2. Temporary Fastening Solutions
Temporary fastening solutions, such as plastic or steel caps, can be used to hold Tyvek in place during installation. These are ideal for non-nail-based surfaces like foam, where staples may not provide sufficient grip. Ensure temporary fasteners do not damage the membrane.
These solutions are meant to stabilize the material until permanent fastening is completed. Avoid leaving temporary fasteners in place long-term, as they may compromise the integrity of the weather-resistant barrier. Always follow manufacturer guidelines for proper installation techniques.
UV Exposure and Material Compatibility
Tyvek UV exposure limits vary by product, with residential use up to 4 months and commercial up to 9 months. Ensure material compatibility to maintain performance and durability.
5.1. UV Exposure Limits
DuPont Tyvek products have specific UV exposure limits to prevent degradation. Residential Tyvek should be covered within 4 months (120 days), while commercial products like Tyvek CommercialWrap must be covered within 9 months (270 days). Exceeding these limits can lead to material degradation, compromising its performance as a water-resistive barrier. Proper planning and scheduling are essential to ensure the membrane is protected from prolonged UV exposure, maintaining its integrity and effectiveness in the building envelope.
5.2. Material Compatibility
DuPont Tyvek is compatible with most common building materials but may react with solvents, fuels, or acid-based products. Ensure compatibility with sealants, adhesives, and other construction materials to avoid chemical reactions. Tyvek can be installed over various substrates, including wood, steel, and foam sheathing, but direct contact with bituminous materials should be avoided. Use Tyvek Tape for sealing laps and seams, as it is specifically designed for compatibility with Tyvek membranes. Always verify compatibility with other products before installation to maintain the integrity of the water-resistive barrier system.
Tools and Equipment Needed
- Utility knife for cutting Tyvek material to size.
- Staple gun with 1-inch crown staples for securing the membrane.
- Tyvek Tape for sealing laps and seams.
- Measuring tape and ladder for precise installation.
- Gloves and safety gear to prevent injuries.
6.1. Basic Tools
Essential tools for Tyvek installation include a utility knife for cutting the membrane, a staple gun with 1-inch crown staples, and Tyvek Tape for sealing seams.
A measuring tape ensures accurate alignment, while a ladder provides safe access to elevated areas. Gloves and safety gear are recommended to protect against cuts and falls.
- Utility knife for precise cutting.
- Staple gun for securing the membrane.
- Tyvek Tape for sealing laps and seams.
- Measuring tape for alignment.
- Ladder for reaching heights safely.
- Gloves and safety gear for protection.
6.2. Specialized Equipment
Specialized tools enhance efficiency in Tyvek installation. A thermal imaging camera detects air leaks, ensuring a tight seal. Custom cutting tools prevent membrane tears, while pressure rollers secure large areas. Spray adhesion promoters are used on difficult surfaces, and laser levels ensure alignment accuracy. Scaffolding or aerial lifts aid in safely reaching heights. These tools optimize installation quality and adherence to manufacturer guidelines for a durable weather-resistant barrier.
- Thermal imaging camera for leak detection.
- Custom cutting tools for precise membrane sizing.
- Pressure rollers for securing large surfaces.
- Spray adhesion promoters for challenging surfaces.
- Laser levels for accurate alignment.
- Scaffolding or aerial lifts for high-reaching safety.
Troubleshooting Common Issues
Address air leaks, uneven surfaces, or improper sealing promptly. Inspect for gaps, wrinkles, or damaged areas, and repair with Tyvek-compatible tapes or sealants for optimal performance.
- Inspect for gaps or damage post-installation.
- Use Tyvek Tape for sealing small tears.
- Ensure proper material alignment and smoothing.
- Reinforce areas with high wind exposure.
7.1. Tears and Punctures
Inspect the Tyvek membrane for tears or punctures immediately after installation. Small damages can be repaired with Tyvek Tape, ensuring a watertight seal. For larger tears, cut a patch slightly larger than the damage and secure it with additional tape. Always smooth out air bubbles or wrinkles to prevent further stress on the material. Regularly check high-stress areas, such as around windows and doors, to address potential weaknesses before they escalate.
- Act quickly to repair tears to maintain the barrier’s integrity.
- Use compatible materials for patches to ensure durability.
- Smooth out wrinkles to prevent stress concentrations.
7.2. Improper Shingling
Improper shingling occurs when Tyvek is not installed in the correct overlapping pattern, compromising water shedding. Always start at the bottom and work upward, ensuring each course overlaps the one below it. If shingling is reversed, water may infiltrate the system. Inspect the installation to confirm proper layering and address any misaligned sections promptly.
- Ensure upward installation to maintain water-shedding functionality.
- Check overlaps for consistency and coverage.
- Correct or replace improperly shingled sections to prevent water intrusion.
No Responses