
Welcome to the Duralast Battery Charger Manual, your comprehensive guide to safe and effective battery charging. This manual provides essential safety tips, operating instructions, and troubleshooting advice to help you maximize the performance and lifespan of your Duralast battery charger. Designed for both novice and experienced users, it ensures proper usage and maintenance of your charger, covering models like the DL-75D and DL-200D. Whether you’re charging standard, AGM, or gel batteries, this guide will help you achieve optimal results. Always refer to this manual before first use to ensure safe and efficient charging.
Key Features and Benefits of the Duralast Battery Charger
The Duralast Battery Charger offers advanced features for reliable and efficient charging. With automatic charging modes, it supports standard, AGM, and gel batteries. The LED status lights provide clear charging progress updates, while built-in safety protections prevent overcharging and overheating. Designed for versatility, it includes fast charge, trickle charge, and desulfation modes. Compatible with 6V and 12V systems, it ensures optimal performance for various vehicles. Durable construction and user-friendly interfaces make it a practical choice for both professionals and DIY enthusiasts, ensuring long-term battery health and peak performance.

Safety Precautions and Important Warnings
Always save these instructions and follow safety guidelines to prevent accidents. Avoid exposing the charger to rain or snow, and use only recommended attachments. Keep out of children’s reach.
3.1 General Safety Tips for Using the Charger
Always place the battery in a well-ventilated area and clean the terminals before charging. Connect the charger to a live grounded outlet and avoid sparks by attaching clamps correctly. Ensure the charger is set to the appropriate mode for your battery type. Keep the charger away from water and flammable materials. Never modify the charger or use unauthorized attachments. Follow all instructions carefully to prevent accidents and ensure safe, effective charging. Regularly inspect the charger and cables for damage. Store the charger in a dry, cool place when not in use.
3.2 Specific Safety Precautions to Avoid Accidents
Never expose the charger to rain or snow, and avoid using it in extreme temperatures. Keep children away from the charger and prevent unauthorized use. Do not overcharge batteries, as this can cause overheating or damage. Always turn off the charger and unplug it before making adjustments. Ensure the charger is properly grounded to prevent electrical shock. Avoid using damaged cables or connectors, as they can cause sparks or fires. Always follow the recommended charging times and modes for your specific battery type to prevent overheating and ensure safety.
How to Prepare the Battery for Charging
Place the battery in a well-ventilated area, clean the terminals to ensure good connections, and check for any visible damage before starting the charging process.
4.1 Cleaning the Battery Terminals
Cleaning the battery terminals is crucial for ensuring proper connections and efficient charging. Use a stiff brush and a mixture of baking soda and water to remove corrosion and dirt. Always wear protective gloves and eyewear during this process. Rinse the terminals with clean water and dry them thoroughly before connecting the charger. Ensure the charger is unplugged from the power source while cleaning to avoid any accidental electrical discharge. Properly cleaned terminals will help maintain a safe and effective charging process for your Duralast battery charger.
4.2 Selecting the Appropriate Charging Mode
Selecting the right charging mode ensures optimal performance for your battery. The Duralast charger offers modes like fast charge, trickle charge, and desulfation. Fast charge quickly replenishes battery power, ideal for emergencies. Trickle charge maintains battery health over time, preventing overcharging. Desulfation helps restore capacity in deeply discharged batteries. Choose the mode based on the battery’s condition and type, such as standard, AGM, or gel. Always refer to the manual for model-specific instructions to ensure safe and efficient charging. Proper mode selection extends battery life and prevents damage.

Step-by-Step Guide to Charging Your Battery
Connect the charger to the battery, ensuring clamps are attached correctly. Place the charger on a dry surface, turn it on, and monitor the charging progress for safety and efficiency.
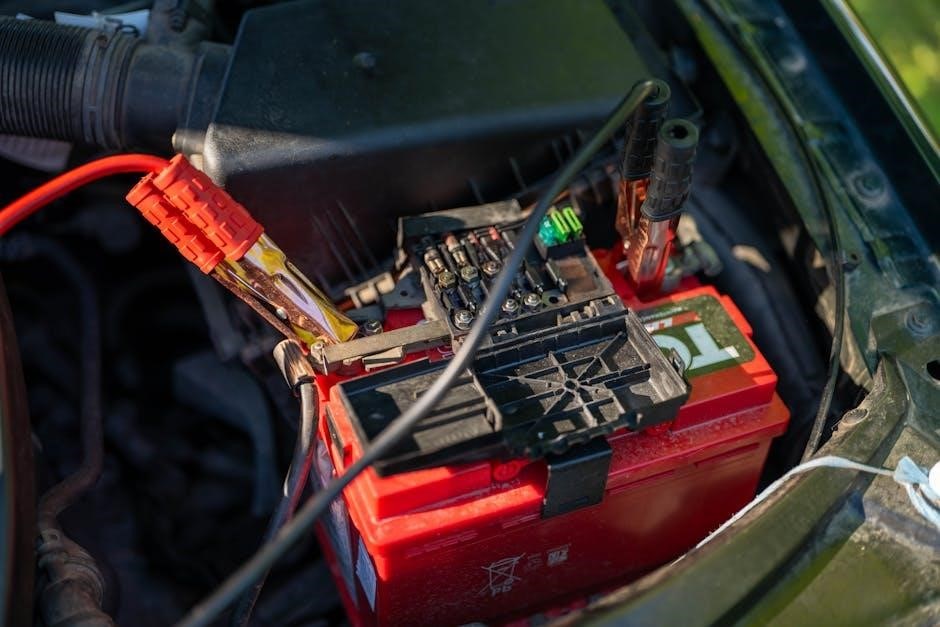
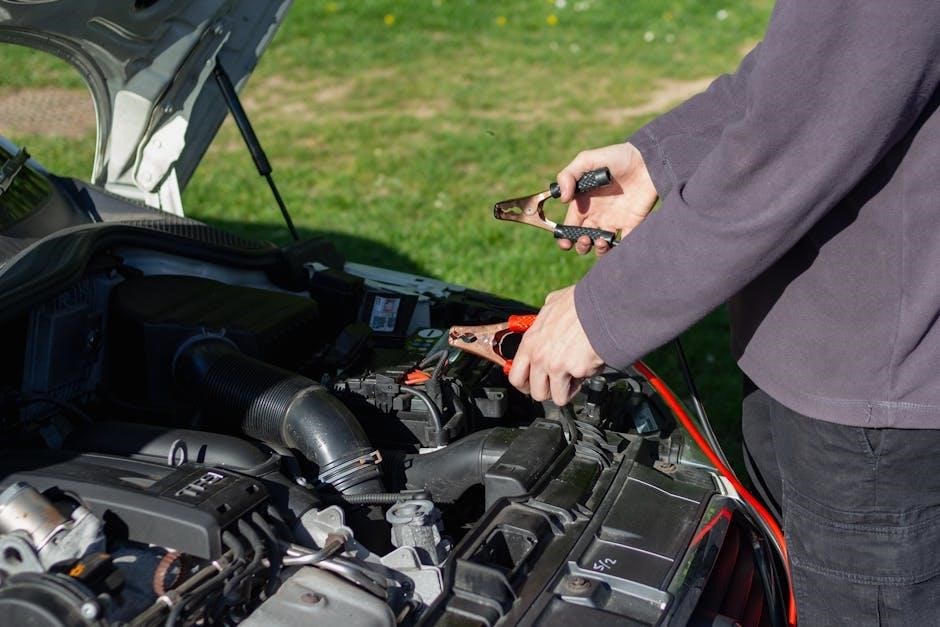
5.1 Connecting the Charger to the Battery
First, locate the positive (+) and negative (-) terminals on your battery. Attach the red clamp to the positive terminal and the black clamp to the negative terminal. Ensure a secure connection to prevent loose contact. Avoid touching both clamps to each other or to metal parts to prevent short circuits. Once connected, plug in the charger and ensure it is placed on a stable, non-flammable surface. Double-check all connections before turning on the charger to ensure safety and proper charging.
5.2 Starting the Charging Process
To begin charging, select the appropriate mode using the rate selection knob based on your battery type and condition. Set the desired charge rate and duration using the built-in timer if available. Ensure the charger is placed on a stable, non-flammable surface. Turn on the charger and monitor the LED indicators to confirm charging has started. Avoid overcharging by checking the progress regularly. Always refer to the manual for specific settings for standard, AGM, or gel batteries. Keep the area well-ventilated and avoid sparks or open flames nearby.
5.3 Monitoring the Charging Progress
Monitor the charging progress by checking the LED indicators on the charger, which display the current charging status. Ensure the battery voltage matches the charger’s settings to prevent overcharging. Regularly inspect the battery terminals for any signs of damage or corrosion. If the charger has an automatic mode, it will adjust the charge rate as needed. Avoid leaving the battery unattended during charging. Refer to the manual for specific guidelines on monitoring different battery types, such as standard, AGM, or gel batteries, to ensure optimal charging and safety.
Maintaining Your Duralast Battery Charger
Regularly clean the charger and store it in a dry, cool place. Check for damage or wear on cables and connectors. Ensure proper function by following the manual’s maintenance tips. Always unplug the charger when not in use to prevent electrical issues. Proper care extends the lifespan and ensures safe, efficient charging for your Duralast battery charger.
6.1 Cleaning and Storage Tips
Regularly clean the charger and cables with a dry cloth to prevent dirt buildup. Avoid using harsh chemicals or moisture, as they may damage the unit. Store the charger in a cool, dry, well-ventilated area away from direct sunlight. Keep it away from flammable materials and out of reach of children. Proper storage ensures longevity and prevents accidental damage. Always unplug the charger when not in use to maintain safety. For extended storage, ensure the charger is fully cooled before placing it in a protective cover or bag.
6.2 Checking for Damage or Malfunction
Inspect the charger and cables regularly for visible damage, such as frayed wires or cracked housing. Look for signs of overheating, like burn marks or unusual odors. Check the LED indicators for error codes, which may signal malfunctions. If the charger fails to turn on or the battery isn’t charging, refer to the troubleshooting section. Ensure all connections are secure and free from corrosion. For unresolved issues, unplug the charger and consult a professional or contact customer support. Regular inspections help prevent accidents and ensure reliable performance.

Troubleshooting Common Issues
This section helps identify and resolve common issues with your Duralast charger. Check connections, verify settings, and consult the manual for solutions. Contact support if problems persist.
7.1 Diagnosing Battery Charging Problems
Troubleshooting begins with identifying the root cause of charging issues. Check for error codes on the LED display and refer to the manual for interpretations. Ensure the charger is properly connected to a grounded outlet and the battery terminals are clean. Verify that the correct charging mode is selected for your battery type; If the charger fails to turn on, inspect the power cord and connections. Consult the manual for specific solutions or contact customer support for further assistance. Regular maintenance and inspection can prevent recurring problems. Always follow safety guidelines when diagnosing issues to avoid accidents.
7.2 Resolving Common Charger Malfunctions
Common issues with the Duralast charger can often be resolved with simple troubleshooting. If the charger fails to turn on, check the power cord and ensure it’s properly plugged into a grounded outlet. For error codes, refer to the manual for specific solutions. Clean dirty or corroded terminals and ensure secure connections. If the charger overheats, allow it to cool in a well-ventilated area. Restarting the charger or resetting it may resolve minor malfunctions. If problems persist, consult the manual or contact customer support for assistance. Regular maintenance can help prevent recurring issues.

Understanding the LED Indicators and Display
The LED indicators on your Duralast charger display charging status, such as green for fully charged or red for charging in progress. Refer to the manual for error codes and their meanings to ensure proper operation and troubleshooting.
8.1 Interpreting the Charging Status Lights
The LED indicators on your Duralast charger provide real-time feedback on the charging process. A green light typically signifies a fully charged battery, while a red light indicates active charging. Some models may feature additional colors or flashing patterns to denote specific states, such as error conditions or maintenance modes. Always consult the manual to understand each light’s meaning, ensuring accurate interpretation and preventing potential issues. Proper interpretation helps maintain the health of both the battery and charger.
8.2 Understanding Error Codes and Warnings
The Duralast charger displays error codes to indicate specific issues during operation. These codes, such as “E1” or “E2,” correspond to problems like overcharging, short circuits, or faulty battery connections. Refer to the manual for a detailed list of codes and their meanings. Warnings, often signaled by flashing lights or alarms, alert you to conditions that require immediate attention. Addressing these issues promptly ensures safe and effective charging. Always consult the troubleshooting section to resolve errors and restore normal functionality. Regular checks can prevent such issues from arising.
The Importance of Reading the Manual
Reading the Duralast Battery Charger Manual is crucial for safe and effective use. It provides essential safety tips, operating instructions, and troubleshooting guidance to prevent battery damage and ensure proper charging techniques. Understanding the manual helps avoid common mistakes and prolongs both battery and charger lifespan. Always refer to it before each use.
9.1 Preventing Battery Damage
Preventing battery damage is a top priority when using the Duralast Battery Charger. Always follow the manual’s guidelines to avoid overcharging, which can shorten battery life. Ensure the charger is set to the correct mode for your battery type, whether it’s standard, AGM, or gel. Regularly inspect the battery for signs of damage or wear before charging. Keep terminals clean to maintain proper connections and avoid sparks. Monitoring the charging process and adhering to safety precautions helps prevent overheating and potential damage. Proper usage extends the battery’s lifespan and ensures reliable performance.
9.2 Ensuring Safe and Effective Charging
To ensure safe and effective charging with your Duralast Battery Charger, always place the battery in a well-ventilated area and keep it away from flammable materials. Connect the charger to the battery terminals correctly, ensuring the positive clamp attaches to the positive terminal and the negative clamp to the chassis or engine block. Avoid overcharging by monitoring the process and unplugging the charger when not in use. Follow the manual’s specific guidelines for different battery types, such as standard, AGM, or gel, to optimize charging performance and maintain safety standards.
This concludes the Duralast Battery Charger Manual. Always follow safety guidelines, maintain your charger, and refer to this guide for optimal performance and longevity of your batteries.
10.1 Best Practices for Long-Term Use
To ensure long-term performance, always store the charger in a dry, cool place and avoid extreme temperatures. Regularly inspect the cables and clamps for damage. Clean battery terminals before charging to prevent poor connections. Avoid overcharging by monitoring the LED indicators or display. For storage, disconnect the battery and keep it at a 50% charge level. Follow the recommended charging modes for your battery type, such as AGM or standard. Finally, refer to the manual for specific maintenance tips tailored to your Duralast model, ensuring optimal functionality and safety over time.
10.2 Where to Find Additional Resources
For additional support, visit the official Duralast website or platforms like ManualsLib, which offer downloadable PDF manuals for various models. AutoZone also provides resources and guides specific to Duralast chargers. If you prefer printed versions, many manuals can be printed directly from these sources. Additionally, customer support teams are available to address specific questions or concerns. These resources ensure you have comprehensive guidance for optimal use and maintenance of your Duralast battery charger, enhancing your overall experience and ensuring longevity of your device.
No Responses